Welcome


Welcome to my blog. You can read about my adventures in different types of needlework, and I also offer some free
cross stitch patterns. Please, come back often. :)

CAN'T SEE THE PICTURES? READ ABOUT THE PROBLEM HERE.

PLEASE NOTE:


PLEASE, NOTE: The designs on this site are copyrighted to Agnes Palko. They are for your personal use only. They may not be distributed or reproduced without permission.
If you wish to use my patterns to stitch for charity, please, let me know.
Showing posts with label motif. Show all posts

06/02/2017

Heart in rainbow colours for Valentines

Hello everyone,


I have been MIA for more than a month, sorry. I got some silly cold and wasn't feeling very well. I did some easy, mindless sewing but couldn't do much of anything that required thinking or counting etc. I will show you some pictures later.
But now it feels I am back among the living :D and getting more active, hopefully.


I was thinking long what to do for Valentine's day. If you have read my blog for a while you might remember that I am not a big fan of it, mostly because in my home country, Hungary, it is a recent holiday, introduced by flower and sweet shops and is all about trying to sell things, without any real meaning or tradition behind it. But perhaps the younger generations feel different about it.

At the end, I made a small heart pattern that expresses much more than just love. It also has a "political" meaning, if you like: the right for everyone to love whom and how they want. I feel very strongly about human rights, and I am following the craftivism movement (crafts + activism that is using crafts for a cause).

This pattern can perhaps be my first, although simple, contribution to craftivism. Use it on a card, a pincushion, a bookmark etc.


Some practical advice:

Don't worry if you don't have the exact colours I used. Just take out your threads, first choose the main colours of the rainbow, then pick out some that can be transition colours (or you can even omit those) and stitch. Have fun playing with your colours.

I hope you like it.
Happy stitching

01/10/2016

Two mandalas - free cross stitch pattern

I haven't written anything here for a while - but I have a good excuse. I am moving flat next Friday, so I am busy sorting and packing things. Most of the boxes are filled with my craft books and stash. Luckily my lovely daughter could come and help me, otherwise I would have had even more problem with my back.

So I really don't have time to write now, nor to sort and organise my latest dyeing samples. But I managed to draw a little pattern for you.

These are two small mandala patterns in black-red-white colour combination. I really loved making them, there might come more later on.

You can use only the circles, I think they would work perfectly for cards. But I draw a backstitch frame around them, and added some small corner elements, so they can be stitched for a pincushion or a biscornu. What else do you think you can use them for?

Have fun, try different colourways.


Happy stitching, friends. Next time I will be writing from my new flat.

28/05/2016

Variations - or how to create embroidery patterns.

I had a homework assignment for university: to create a 3-minute videofilm, that is connected to my topic (trees) and my chosen craft (embroidery). So I came up with this idea: you take a very simple motif, like a tree, and draw a really simple line drawing. It dies not have to be anything pretty, you don´t need to be able to draw. Really. Believe me :)

You can then embroider this with different stitches, and then try to do different variations. A tree, or any other object from nature is good to start with because there is no need to be accurate, symmetrical, there is no correct or incorrect shape. Feel free to improvise, experiment, try out different stitches, different colours, materials - go wild!

Here is the little film I made (not very good, but I think you get the gist - and then this was my first film!). Then you can see the photos of the embroidered pieces I made for the film.

And then there comes some more variations of the cross stitched version. You will see that I did not really pay much attention where I put the apples/leaves/flowers on the tree. You can follow the pattern, but you can just make your own version and stitch them randomly.


I hope you will really enjoy the creating process. Please, post here if you stitch something based on this idea, I would love to see them.


07/05/2016

Small flowers - and variations on a motif


I have been working hard writing homework assignments for university. I have been late with almost everything all term - what with the operation, pain, not sleeping etc - but finally managed to catch up. Not much left to do until it is over. It was fun to do this course but at the same time it was lots of stress.

Anyway, in the euforia after sending in the last piece of homework today, what better can a girl do than sit down to the computer and start playing with the cross stitch program?

I have come up with a very simple motif: a circle with squares in it. I am sure I am not the first one ever to do this :) I played around with the motif in different sizes, different colours, different arrangements. This is the result:


First three small flower patterns, combinations of the two motifs, and I am sure there can be further variations. I think they are cute, simple, quick to stitch - perfect for cards.


Then I created some patterns that can be used to fill in bigger surfaces, or parts of them used for cards, biscornus, bookmarks, borders etc. They are not really patterns for a certain project, more like possibilities that you can use - and I encourage you to use them - in many ways. I have many similar things on my computer, I don't usually publish them, I am waiting until I can finish them into something. Which sometimes happens, but most often not. I was thinking why not try to put them on the blog as they are - perhaps someone finds them useful.


I really would like to know if you, my dear readers, find these type of patterns useful. In what ways do you think you could use them? Would they inspire you to try your own variations? Please let me know in the comments.

Happy stitching.

Ági

27/06/2015

Blackwork biscornu pattern


I am continuing with the folk art inspired motifs. This time I made a blackwork pattern in blue, for a small biscornu or pincushion.

I am going to Hungary soon, so I probably won´t have time to stitch this, and anyway, I am full of half-finished projects, so I should not start something new. But knowing myself, I can´t promise anything :)

Hope you like this little pattern. Let us see if you make it!

Happy stitching

02/06/2015

More about biscornu - my own ideas

As promised, here come some more ideas and experiments with the biscornu and its variations, as well as some other types of pincushions.


1. Cross stitch (or any embroidery) on one side, backing fabric on the other.

The big biscornu I showed you last time, was made from a cross stitched square and a piece of fabric on the backside (unfortunately it does not show in the picture, and since it was a gift to someone, I cannot take more photos). I did not do the backstitched border and the whipstitching on this, I simply sewed the two squares right sides together, one corner matched to the centre of the other square. I sewed by hand, as I did not have a sewing machine back then.


I was wondering if it was possible to do it "properly", I mean with backstitch and whipstitch, even when you have another type of fabric on one side. The key would be to make backstitches on the other fabric the same size as on the Aida, then it should work. Need to try one day. Has anyone done this?


2. Biscornu made of felt, with blanket stitch.

I often do embroidery on a piece of felt when I sit in the classroom with my year 5 classes. When they have started their sewing and they don´t need my help so often, I sit down at the table with them and doodle with a piece of felt and some leftover thread pieces. They like to see that I sew for my own pleasure and often get inspired by what I do. This little embroidered piece was the product of such lessons. I then put it together with another square the same size and sewed them together with blanket stitch. It turned out OK, although it was much more difficult to match the corners than with Aida. It is not easy to be exact with the blanket stitch, and the felt stretched out a little as I was sewing. Some corners are not perfect, but all in all, I like the result.

I think it probably works with any other fabric plus blanket stitch - felt is just easier because it does not fray.


3. Biscornu with no sharp corners

Another variation that I came up with is what I call "the wavy biscornu". I designed the pattern so that I cut off the corners of the squares, and the biscurnu becomes softer in appearance, the corners are not so pronounced. I really like the effect.


Here and here you can see how the pattern looks like for such a biscornu. I marked with arrows on the pattern how the squares should be put together.

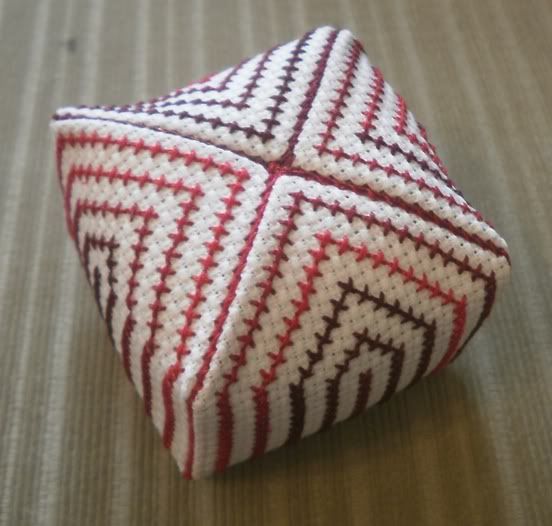
4. A cube pincushion

Here is another shape I came up with: it looks like a cross shaped pattern when embroidered, but then it comes together to a little cube. For a long time this was my most popular pattern on the blog. :)


Photobucket


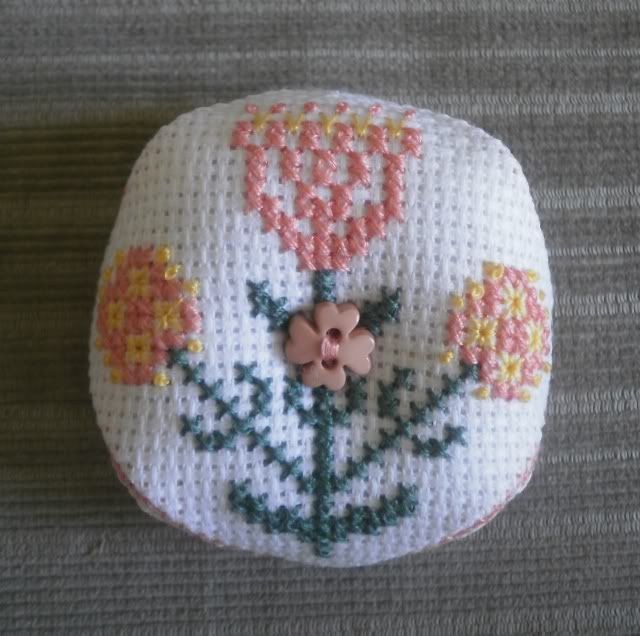
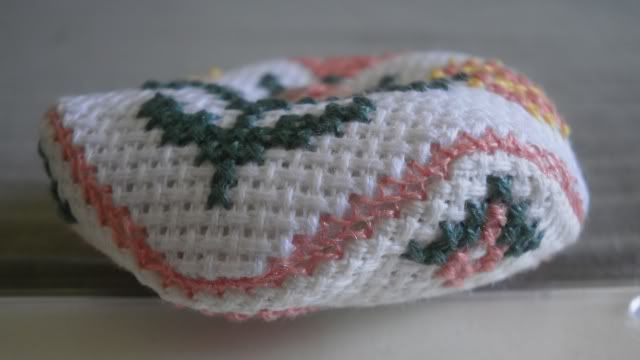
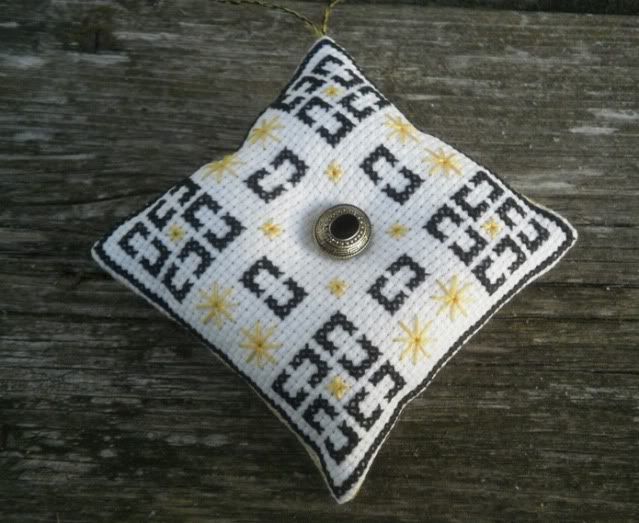
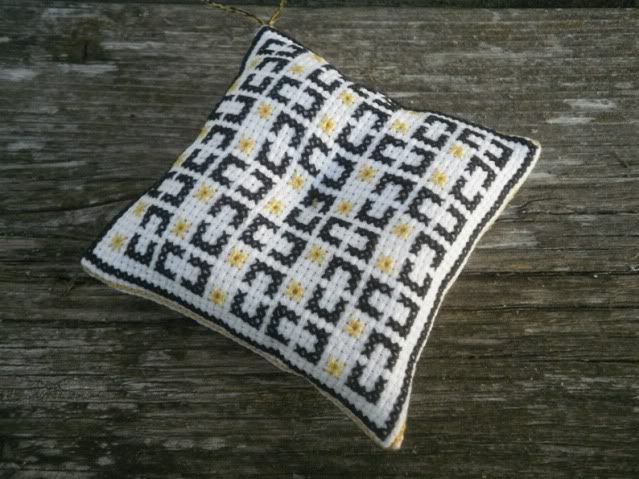
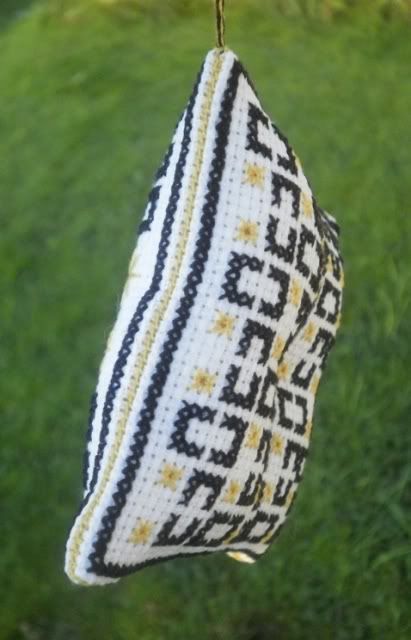
5. Then, of course, there is the more traditional pillow-shaped pincushion, that can also be done with a button in the middle:

Photobucket

Photobucket

Photobucket


6. A variation on this is the so called mattress pin cushion, when you sew a narrow rectangle on all the four sides between the two squares. This is what I did with my latest pattern:


If you need detailed instructions for this type of pincushion, you can find one on this blog.

If you find a biscornu (or any square) pattern that you like, it is easy to turn it into a mattress pincushion. Design the small rectangles yourself: they should be the same width as the squares, and only 10-12 stitches high. Then find a small element in the original pattern that you can put in these rectangles.


7. Bi-biscornu

I have also come up with another shape that I called the "bi-biscornu". It is a cross between a biscornu and a mattress pincushion.


I have promised to write how it is made but never did, so perhaps it is time to do it.

Here is the pattern. It was made before I got my cross stitch program, it is not a pdf file, just a picture. Right click to download.


As you see, the pattern has exactly the same pieces as for the mattress pincushion. To sew together, match a corner of a small rectangle to the middle of a square. Start whipstitching together. Then add the next rectangle and the next. Then sew the other square the same way: the middle of the square meets the corners of the rectangles. I hope it makes sense.


8. And finally, some unusual shapes I have experimented with, that also use the backstitched line + whipstitching method.


These are patterns for sale, you can find them here.

I hope you can find inspiration for pincushions and biscornus in these posts. Please, send a picture if you make one of these, I would be happy to post them on the blog.

Happy stitching!


21/04/2015

New biscornu pattern

Hello, friends,


I have been doodling a bit - and all of a sudden it became a biscornu pattern.

I added a little narrow band as well, this way you can choose whether you want to sew it together as a biscornu or as a small pillow with a side.

I hope you like it. Happy stitching.


Edit: do you want to see how it looks stitched? Here it is, in this post. Just scroll down.

24/03/2015

Spring bird freebie - and some more sewing progress.

Hello, everyone, I hope spring has finally arrived at your doorstep - we are still waiting. And waiting… But it cannot be long now :)


Here are a few pictures of my further sewing experiments.
Tried to make a CosPlay costume, for the anime character called Shirayuki Mizore. This was an assignment for the university course. The course is not only about textiles but also about the pedagogy of teaching textile crafts and I like it a lot. We had to choose a topic that would be interesting for our students, so that´s how I ended up with the anime. I myself didn´t know anything about it before.
Anyway, this is what I came up with. The colours are not really good, I was working after a picture from the net, and only found a description of her clothes with all the colours when it was too late.

I sewed the pleated skirt (again, not perfect but perhaps not too bad), and I also made a very simple A-line mini-skirt. We had to think about our students, and I believe the pleated skirt, even the Simplicity skirt with the plaid fabric (see my previous post) would be too difficult. The jumper I made following a simple hoodie pattern, just made a little change at the neck.

Oh, and we practiced fashion sketches, it was really cool. :)


I am in Umeå right now, at the university. We are going to learn pattern making this time, which I really look forward to.


And now, cross stitch. I have created a spring bird cross stitch pattern for you. And for myself, actually - I don´t always stitch my patterns, or rather, haven´t yet, but I am going to do this one as soon as I get home. Just can´t decide which version. I think they would make lovely decoration on an easter basket or pillow…


Hope you will have fun stitching the bird, let me know if you do.

Happy stitching

09/02/2015

More hearts - for Valentine or not

As I was browsing through my files today, look what I found. These heart designs I made last summer, and somehow forgot about them. Funny, isn't it, that I would find them just a few days before Valentine's Day.


There are two versions in black and white: a smaller and a bigger one. And then the smaller one I also made in colour, with two different colour schemes. I really like these unusual colours, but feel free to use whatever colours you prefer. Looking forward to seeing your versions. :)

Happy stitching.


Subversive Valentine

After yesterday's broken heart post I got some criticism that I am becoming kitschy… or mushy… and perhaps there is something in it. :)

So, as an answer, I came up with a simple subversive cross stitch pattern for those who have different feelings about Valentine day. And it is anyone's guess which one I truly agree with ;)


Happy stitching :)

23/08/2014

Christmas stitching started


(Since this seems to be one of the most popular posts on my blog recently, I thought to give all that visit here a bit of encouragement: click on Home at the bottom of the page. Right now (31st August 2014) there is a giveaway you can sing up for! Welcome!)


Hello, I am here again.

First week of school is over. God, I am sooooo tired! Even though we only had three proper teaching days, the first two days being mentor time, discussing school rules, team building etc. with my class. I feel really lucky, the kids seem to be very nice, all of them, and my co-mentor is fabulous!
In my lessons, I started felting with my year 6, we made some felted balls and next lesson we will make a piece of fabric that can be used to sew with. With year 7 classes, we started knitting/crocheting, most of them are really excited about it and that is such a good feeling. With the little ones, year 5, I only had lessons with two of the classes, we will do hand sewing with felt, and we were playing with the leftover pieces from last year - I teach them not waste fabric and try to use all pieces, even the tiny ones. The other two classes will start weaving next week - I only have enough looms for two classes, so we have a rotation and it works quite well. I have a really good feeling about this year, I feel much more prepared than ever before, and I have made changes in my program where I felt it needs to be made a bit less "work" and more fun. Wish me luck, please :)

Also, as autumn is slowly creeping in under the threshold, I started thinking about my plans for the Christmas fair. Learning from last years experience, I want to make lots of things for Christmas decoration, ornaments and such. I realised that people go to these fairs not to buy their presents (for that they prefer to use the shops), but more for the feeling, for the atmosphere. Most of what I sold last year were ornaments, so I am going to do more of those.

I had an idea about a cross stitched christmas wreath. I even made a little experiment, cut out a kind of doughnut-shape from a piece of fabric, or rather two and sewed them together to see how it looks stuffed. It looked good, so I am going for it. I want to have a piece of embroidery on the front and some christmasy fabric on the back.

There is one problem though: the circles can be sewn together with the sewing machine on the outward line, but not on the inner one, otherwise it cannot be turned inside out. So the inner circle will have to be sewn by hand. I hope it will work out all right still. I will perhaps attach some cord around it to hide the sewing line if it is not nice enough :D

Anyway, I made my cross stitch pattern for one, I am going to start it right away to see how fast I can make one. Then I am planning to design some more in different sizes.

I am sharing the pattern with you all out there, I hope you like it. I will also be back with instructions on ho to sew the wreath when I am done. So watch this place! Also, if you don't want a wreath, you can use it for a cushion.
Have you started your Christmas stitching yet? Have you got some good ideas for me for the market? Please share.


As usual, clicking on the pictures will take you to the downloadable pdf file from my google account. If you have any problems with that, let me know.
The two patterns are identical, except the border that is red in one and green in the other.
I drew some elements in a yellow colour, and I think that could look all right, but actually I am planning to stitch that in golden metallic. Only I didn't have that in my colour palette. So my intentions are:

DMC 444 Lemon dk = golden metallic


Happy stitching from

Agi :)


Edit:
Oops, I have just finished stitching this and noticed a mistake in the pattern. Now I have corrected it and uploaded the good version, if you want to download it again. Or just make sure you check the golden backstitch lines and make them symmetrical in the bottom middle part.

Here is my stitched version. The gold metallic does enhance it a lot, don't you think so?


Edit #2

I have finished it in a wreath. I will post a tutorial on how to do this. I am not 100% happy with it, it was impossible to stuff it nice and smooth. But it is quite near to what I imagined at the beginning.