I haven't written anything here for a while - but I have a good excuse. I am moving flat next Friday, so I am busy sorting and packing things. Most of the boxes are filled with my craft books and stash. Luckily my lovely daughter could come and help me, otherwise I would have had even more problem with my back.
So I really don't have time to write now, nor to sort and organise my latest dyeing samples. But I managed to draw a little pattern for you.
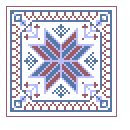
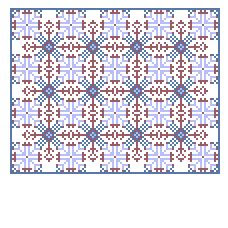
These are two small mandala patterns in black-red-white colour combination. I really loved making them, there might come more later on.
You can use only the circles, I think they would work perfectly for cards. But I draw a backstitch frame around them, and added some small corner elements, so they can be stitched for a pincushion or a biscornu. What else do you think you can use them for?
Have fun, try different colourways.
Happy stitching, friends. Next time I will be writing from my new flat.
Welcome
Welcome to my blog. You can read about my adventures in different types of needlework, and I also offer some free cross stitch patterns. Please, come back often. :)
CAN'T SEE THE PICTURES? READ ABOUT THE PROBLEM HERE.
PLEASE NOTE:
PLEASE, NOTE: The designs on this site are copyrighted to Agnes Palko. They are for your personal use only. They may not be distributed or reproduced without permission.
If you wish to use my patterns to stitch for charity, please, let me know.
Showing posts with label tüpárna. Show all posts
01/10/2016
27/06/2015
Blackwork biscornu pattern
I am continuing with the folk art inspired motifs. This time I made a blackwork pattern in blue, for a small biscornu or pincushion.
I am going to Hungary soon, so I probably won´t have time to stitch this, and anyway, I am full of half-finished projects, so I should not start something new. But knowing myself, I can´t promise anything :)
Hope you like this little pattern. Let us see if you make it!
Happy stitching
21/04/2015
New biscornu pattern
Hello, friends,
I have been doodling a bit - and all of a sudden it became a biscornu pattern.
I added a little narrow band as well, this way you can choose whether you want to sew it together as a biscornu or as a small pillow with a side.
I hope you like it. Happy stitching.
Edit: do you want to see how it looks stitched? Here it is, in this post. Just scroll down.
I have been doodling a bit - and all of a sudden it became a biscornu pattern.
I added a little narrow band as well, this way you can choose whether you want to sew it together as a biscornu or as a small pillow with a side.
I hope you like it. Happy stitching.
Edit: do you want to see how it looks stitched? Here it is, in this post. Just scroll down.
Labels:
biscornu,
cross stitch,
free,
freebie,
gratis,
ingyenes,
keresztszemes,
korsstygnsmönster,
minta,
mönster,
motif,
pattern,
tüpárna,
xstitch
20/02/2015
Blackwork biscornu for St. Patrick's Day
Hello,
I am back with more reports about my knitting - crochet course, with some more felting and some embroidery, a finally finished long-time WIP and another freebie - this time it is blackwork for St. Patrick's Day.
Here is a picture from one of my lessons. We just started our knitting unit, and I used this technique that I called the "human knitting machine" to teach the kids the basics. It was great fun! I learnt this at the university. It works the same way as finger knitting or the knitting looms, we just used the kids' hands instead of the pegs.
And here come some more pictures of my homework for the course.
To try out different materials, I did some crochet with a thick cotton cord. The flower shape, as well as the third one, in wool, was done with freeform crochet: I used no pattern, just started and then went on to see what happened. It was fun.
I tried out shadow knitting. I borrowed a book from the library, this one and tried to create my own pattern. While the book has some lovely modern looking pieces, and I found a few interesting pieces on the internet too, my experiment turned out a disaster. I wasn't thinking clearly, I should have realised that the pattern will become too long - I should have adjusted it accordingly. There was no time to do another experiment, and now I am busy with the next course, but this needs to be put on my list of "To try again". I certainly recommend trying this, it looks complicated but it isn't really and it is cool.
Another thing I learnt is called tvåendsstickning in Swedish. It means two-end-knitting, but it is usually called twined knitting in English. The basic technique is that you knit with tho threads, even if there is only one colour. They usually used the two ends of the same yarn ball, hence the name. The first stitch is knitted with one yarn, the second with the other and so on. Between each stitch you twist the threads. It makes a thick, firm fabric, there is hardly any stretch in it. Traditionally you have to do it with z-spinned yarn, that's what I was using for my mittens. I think it works with the usual s-spinned yarn, too, it only looks a bit different. I designed the pattern with the flowers myself, and on the palm side I was just improvising.
This is what it looks like on the inside. You can see how the twisted yarns create almost like a cord on the wrong side of the fabric.
Another homework was to take a knitted woollen sweater or something, felt it in the washing machine, and experiment with it: embroider on it, cut it apart etc. This is what I made out of two pieces. It's a vest, the collar and the sides come from one piece, the "body" from another. I added the crocheted band on the shoulders and around, and the embroidery. On the right side there is a Hungarian motif, on the left a Swedish one. I myself dyed the thread to match the rest.
Two pairs of socks that I also made. The first is knitting the traditional way - although that is still quite new to me. The other was knitted toes-up, and with an afterthought heel. Both of them were made on circular needles, instead of the usual double pointed ones, using the magic loop. I love this technique!
We also had a group homework: we had to create a piece together, on a chosen topic within "communication". We chose "power". We created a puzzle, and this is my piece. I collected a few pictures from the internet for inspiration, and then used a piece of a felted woollen pullover as background, then needle-felted and embroidered my interpretation.
I have collected quite a few links for all these techniques, if you are interested, go and look at my Pinterest page.
My old visitors can perhaps remember how I started to do some weaving on a huge piece of cardboard - perhaps two years ago? Shame, I know, but now I finally managed to finish it.
Although the edges became strangely loose, I still like it a lot. In the middle it is quite nice - not too densely packed but the boucle yarn has made a good, solid fabric, and still soft. I will use it as a scarf. I will take it off the cardboard and tie the ends tomorrow.
And finally, my freebie for you today. I made a blackwork pattern that reminds me of clovers, so I thought it would be perfect for St. Patrick's Day. But with another colour it might give a different effect.
I made it into a biscornu pattern, I hope you will enjoy it. Some more clover patterns are coming soon.
Edit:
If you are interested in St. Patrick's Day patterns, why not take a look at my other freebies here, here and here?
I am back with more reports about my knitting - crochet course, with some more felting and some embroidery, a finally finished long-time WIP and another freebie - this time it is blackwork for St. Patrick's Day.
Here is a picture from one of my lessons. We just started our knitting unit, and I used this technique that I called the "human knitting machine" to teach the kids the basics. It was great fun! I learnt this at the university. It works the same way as finger knitting or the knitting looms, we just used the kids' hands instead of the pegs.
And here come some more pictures of my homework for the course.
To try out different materials, I did some crochet with a thick cotton cord. The flower shape, as well as the third one, in wool, was done with freeform crochet: I used no pattern, just started and then went on to see what happened. It was fun.
I tried out shadow knitting. I borrowed a book from the library, this one and tried to create my own pattern. While the book has some lovely modern looking pieces, and I found a few interesting pieces on the internet too, my experiment turned out a disaster. I wasn't thinking clearly, I should have realised that the pattern will become too long - I should have adjusted it accordingly. There was no time to do another experiment, and now I am busy with the next course, but this needs to be put on my list of "To try again". I certainly recommend trying this, it looks complicated but it isn't really and it is cool.
Another thing I learnt is called tvåendsstickning in Swedish. It means two-end-knitting, but it is usually called twined knitting in English. The basic technique is that you knit with tho threads, even if there is only one colour. They usually used the two ends of the same yarn ball, hence the name. The first stitch is knitted with one yarn, the second with the other and so on. Between each stitch you twist the threads. It makes a thick, firm fabric, there is hardly any stretch in it. Traditionally you have to do it with z-spinned yarn, that's what I was using for my mittens. I think it works with the usual s-spinned yarn, too, it only looks a bit different. I designed the pattern with the flowers myself, and on the palm side I was just improvising.
This is what it looks like on the inside. You can see how the twisted yarns create almost like a cord on the wrong side of the fabric.
Another homework was to take a knitted woollen sweater or something, felt it in the washing machine, and experiment with it: embroider on it, cut it apart etc. This is what I made out of two pieces. It's a vest, the collar and the sides come from one piece, the "body" from another. I added the crocheted band on the shoulders and around, and the embroidery. On the right side there is a Hungarian motif, on the left a Swedish one. I myself dyed the thread to match the rest.
Two pairs of socks that I also made. The first is knitting the traditional way - although that is still quite new to me. The other was knitted toes-up, and with an afterthought heel. Both of them were made on circular needles, instead of the usual double pointed ones, using the magic loop. I love this technique!
We also had a group homework: we had to create a piece together, on a chosen topic within "communication". We chose "power". We created a puzzle, and this is my piece. I collected a few pictures from the internet for inspiration, and then used a piece of a felted woollen pullover as background, then needle-felted and embroidered my interpretation.
I have collected quite a few links for all these techniques, if you are interested, go and look at my Pinterest page.
My old visitors can perhaps remember how I started to do some weaving on a huge piece of cardboard - perhaps two years ago? Shame, I know, but now I finally managed to finish it.
Although the edges became strangely loose, I still like it a lot. In the middle it is quite nice - not too densely packed but the boucle yarn has made a good, solid fabric, and still soft. I will use it as a scarf. I will take it off the cardboard and tie the ends tomorrow.
And finally, my freebie for you today. I made a blackwork pattern that reminds me of clovers, so I thought it would be perfect for St. Patrick's Day. But with another colour it might give a different effect.
I made it into a biscornu pattern, I hope you will enjoy it. Some more clover patterns are coming soon.
Edit:
If you are interested in St. Patrick's Day patterns, why not take a look at my other freebies here, here and here?
24/03/2013
Pastel biscornu
I created another biscornu pattern with geometric motifs, in lavender and mauve colours. I just love how these colours look together.
I also made a repetitive pattern for covering bigger surfaces, using the same motifs as in the biscornu. Perhaps someone has a good use for it.
Enjoy :)


Labels:
biscornu,
cross stitch,
free,
freebie,
geometric,
gratis,
ingyenes,
keresztszemes,
korsstygnsmönster,
mini,
minta,
motif,
pincushion,
tüpárna,
xstitch
05/01/2013
"Bibiscornu" - a new type of biscornu
I have come up with another new type of biscornu and since it actually doubles the corners in a way, I called it a "bibiscornu" - but if anyone can come up with a better name, suggestions are welcome.
I am publishing quite a lot of free patterns here, but I thought that those that involve coming up with a new structure, not simply another cross-stitch chart, would be my "capital" - and I am trying to sell those. There hasn't been a huge rush to buy my patterns, so far I have sold 3 of them in more than half a year. I am not expecting much, to be honest, I know that most of us are out there on the hunt for more freebies. Why buy something when you can find similar patterns for free?
Still, I hope that some people who enjoy all the freebies, when they can afford, will also buy something, especially if that means something new, like the twisty biscornus you can find on the Patterns for sale page. Or the newest variation on the traditional one, the bibiscornu:
I still have to write the instructions, it will be available in a few days.
I am publishing quite a lot of free patterns here, but I thought that those that involve coming up with a new structure, not simply another cross-stitch chart, would be my "capital" - and I am trying to sell those. There hasn't been a huge rush to buy my patterns, so far I have sold 3 of them in more than half a year. I am not expecting much, to be honest, I know that most of us are out there on the hunt for more freebies. Why buy something when you can find similar patterns for free?
Still, I hope that some people who enjoy all the freebies, when they can afford, will also buy something, especially if that means something new, like the twisty biscornus you can find on the Patterns for sale page. Or the newest variation on the traditional one, the bibiscornu:
I still have to write the instructions, it will be available in a few days.
Labels:
biscornu,
cross stitch,
experiment,
finishes,
for sale,
keresztszemes,
korsstygnsmönster,
minta,
mönster,
ornament,
pattern,
pincushion,
tüpárna,
xstitch
21/05/2012
Geometric quilt cross stitch pattern
I have made another quilt-style cross stitch pattern.
The smaller squares, I think, are perfect for a biscornu or ornament and the bigger is just the right size to stitch for a needlebook, if you fold it in the middle.
You can also stitch it vertically, for a book cover. This is what I plan to do with it when I have time.
The colours are:
326 rose vy dp
3778 terra cotta lt
and the white squares are left empty, assissi-style, but of course, you can stitch them or substitute your favourite colours.
I hope someone out there will find pleasure in stitching these. :)
Labels:
biscornu,
cross stitch,
free,
freebie,
gratis,
ingyenes,
keresztszemes,
korsstygnsmönster,
korstygn,
minta,
mönster,
motif,
ornament,
patchwork,
pattern,
pincushion,
quilt,
tüpárna,
xstitch
13/09/2011
pincushion
I made a pincushion out of the black-gold pattern I stitched a while back. For the other side, I improvised a variation of the pattern, will draw it and post it soon.
I am sure it would look good as a biscornu, too.


I am sure it would look good as a biscornu, too.
Labels:
cross stitch,
finishes,
free,
freebie,
ingyenes,
keresztszemes,
pincushion,
tüpárna,
xstitch
Subscribe to:
Posts (Atom)