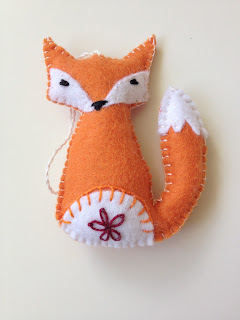
I posted some pictures of my foxes on Facebook, and a friend asked where I got the pattern. I made it myself, so I promised her to share it. Then I thought I might just as well share it here on the blog with everyone.
Here is the pattern. This is half an A4 page (A5, I think). As you can see on the measuring tape that I put next to it, the fox is about 9 cm (3,5") big. I am sorry I cannot help with how you should print it out to have the right size, I don't have a printer at home so I cannot try it. But if someone can figure it out, please let me - and the other readers - know. On the other hand, it does not matter too much if the final size is a bit bigger or smaller.
If you are planning to make more than one, it is better to copy the pattern on a piece of cardboard, otherwise just normal printing paper works. I usually pin the pattern to the felt, and cut next to it, to avoid having to draw on the felt itself.
Cut the fox shape out of orange felt, you will need 2 pieces. Then cut the small details from white felt: two pieces for the face, one for the tummy and two for the tail.
I usually sew the face and the tail on with white thread, and very small running stitch. The tummy I often decorate with a tiny embroidery, then sew on with blanket stitch. On these examples I used orange thread, but sometimes I just use all kinds of colours. I often use small left-over thread pieces for these projects.
You don't need to sew the details all around, only those sides that will not be sewn with the final blanket stitch. Like this:
Finish the face: use black thread to embroider the eyes and the nose.
The back side of the fox only gets one detail: the tail.
Then sew the front and back together with small blanket stitch. It is good to start in the curve between the tail and the body, and sew the tail first, and stuff it as you go. It will be difficult to stuff it later. I usually stuff the tail really hard, otherwise it does not look very nice. I also add a cord on the top of the head, but that is optional.
Here is a picture of how I make them in an assembly-line.
I hope you like this tutorial. Let me know if something is not clear.
Happy stitching.
Pages
▼
29/06/2016
24/06/2016
Glad midsommar - free summer wreath pattern
Today in Sweden we celebrate midsommar, that is Midsummer. It is common that girls wear a wreath made of wild flowers.
To honour this tradition, I created a summer wreath pattern. Enjoy, and happy Midsummer to all.
To honour this tradition, I created a summer wreath pattern. Enjoy, and happy Midsummer to all.
06/06/2016
Hang a bird in the window
It happened twice in the past 5 years - since I have been living here - that a bird flew into the window and died. In my apartment there are windows on both sides. Apparently, the birds see the light from the other side, they don't see the window, and they think they can fly through. After the first case I wanted to hang a dark bird shape - but I did not like the idea of watching a black shape all the time. So instead I made a patchwork bird for one of my windows. But then it happened again, so now I have a patchwork bird in each window. See the tutorial here .
In case you are not into patchwork but love cross stitch, I created a pattern that I am sharing with you all here. One is colourful, kind of summery, the other is almost just one colour - you can choose which colour you want in case you wish to match the bird to your curtains or the rest of the decorations.
Click on the picture to get the pdf pattern.
After stitching, this needs to be sewn onto a dark background - it is important that from the outside the birds see a dark shape. I read somewhere that they think it is the shadow of a predator bird and avoid it. I will write a tutorial how to do that in a few days. Until then, get stitching your bird. :D
Edit on 9th June: I have finished the stitching.
(I noticed some mistakes, or I should say I made a mistake while stitching: I tried to do the upper and the bottom halves symmetrical but I didn't draw it that way, so I had to wiggle it here and there. Just in case you notice that it is not exactly following the pattern ;) )


